上一篇中介绍了 JWT (opens new window)(JSON WEB TOKEN),本篇则写一下在工程中如何使用 JWT (opens new window)。
我们可以在官网看到有很多仓库已经封装好了 JWT (opens new window),这里我们选择了第一个 java-jwt (opens new window)
<!-- JSONWEBTOKEN -->
<dependency>
    <groupId>com.auth0</groupId>
    <artifactId>java-jwt</artifactId>
    <version>3.8.1</version>
</dependency>
1
2
3
4
5
6
2
3
4
5
6
回忆一下 JWT 的介绍篇,第一步:在验证用户(登录)的位置给用户签发 token,第二步:在用户访问需要验证权限的资源(数据)的时候验证 token
# 签发 token
签发 token 一般选择在验证用户信息的时候,有时候一些关键操作需要单独签发 token 来验证,比如用户在操作一些涉及资源的销毁,支付时需要单独验证用户信息签发一次性 token。
	// 授权请求/响应头字段
	public static final String HEADER_AUTHORIZATION = "Authorization";

	// secret 一定不能让别人知道
	public static final String JWT_SECRET = "YebNZYFXAL1qUjX8516Mi";

	// 签发人
    public static final String JWT_ISSUER = "auth0";

	/**
     * 登录
     */
    @PostMapping("/login")
    public Rs login() {

        String username = requireStringParam("username");
        String password = requireStringParam("password");

        User checkByName = userService.findByName(username);
        if(null == checkByName) {
            throw new InvokeException(Rs.ERROR_CODE_BIZ, "该账户还未注册,请先注册!");
        }
        User user = new User();
        user.setUserName(username);
        user.setPassword(DigestUtils.md5DigestAsHex(password.getBytes()));
        User loginUser = userService.login(user);

        if(null == loginUser) {
            // 这里可以做一个错误次数放在 session 或者内存中,后面方便做登录限制
            throw new InvokeException(Rs.ERROR_CODE_UNAUTHORIZED, "用户名或密码错误。");
        }

        // 生成 token 信息
        Algorithm algorithm = Algorithm.HMAC256(JWT_SECRET);
        Date expireTime = new Date();
        expireTime.setTime(expireTime.getTime() + 1000*60*30); // 半小时
        String token = JWT.create()
                .withIssuer(JWT_ISSUER) // 签发人
                .withExpiresAt(expireTime) // 过期时间
                .withClaim("username", loginUser.getUserName()) // 当前登录用户名
                .withClaim("id", loginUser.getId()) // 用户编号
                .sign(algorithm);
        // 将签发好的 token 放到响应头中,当然也可放到 Cookie 或者响应对象中。
        response.setHeader(HEADER_AUTHORIZATION, "Bearer " + token);
        return Rs.ok(loginUser, "登录成功");
    }
1
2
3
4
5
6
7
8
9
10
11
12
13
14
15
16
17
18
19
20
21
22
23
24
25
26
27
28
29
30
31
32
33
34
35
36
37
38
39
40
41
42
43
44
45
46
2
3
4
5
6
7
8
9
10
11
12
13
14
15
16
17
18
19
20
21
22
23
24
25
26
27
28
29
30
31
32
33
34
35
36
37
38
39
40
41
42
43
44
45
46
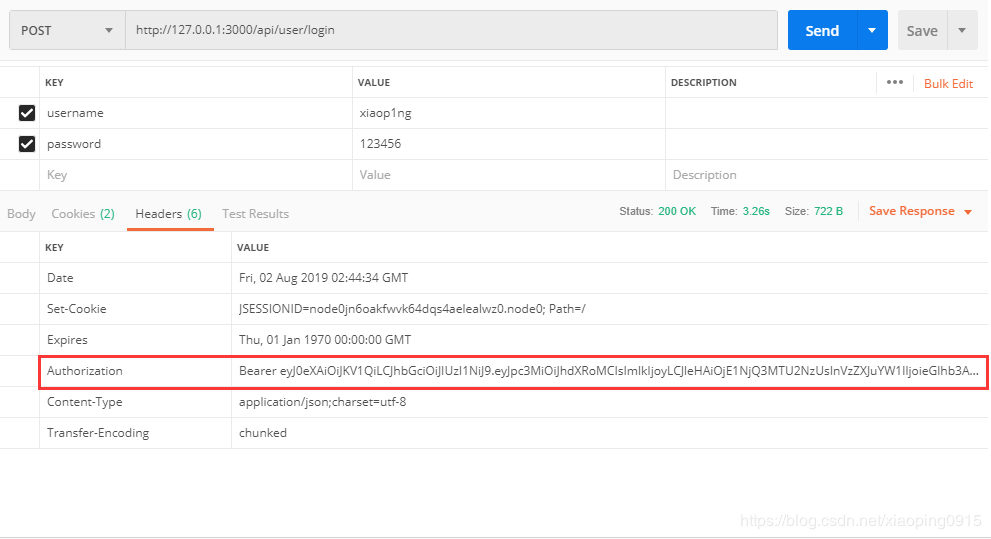
当访问这个登录接口成功后,响应头中就会有了 Authorization 字段了。
# 验证 token
/**
* test AuthorizationInterceptor
*/
@RequestMapping(value = "/auth", method = RequestMethod.GET)
@ResponseBody
Rs auth() {
String authorization = request.getHeader(HEADER_AUTHORIZATION);
if(StringHelper.isEmpty(authorization)) {
throw new InvokeException(Rs.ERROR_CODE_UNAUTHORIZED, "no authorization.");
}
String token = authorization.replace("Bearer ", "");
Algorithm algorithm = Algorithm.HMAC256(JWT_SECRET);
JWTVerifier verifier = JWT.require(algorithm)
.withIssuer(Constans.JWT_ISSUER)
.build(); //Reusable verifier instance
// 这里的 verify(token) 会验证 token 的签名对不对,同时也会验证 token 是否过期
DecodedJWT jwt = verifier.verify(token);
String username = jwt.getClaim("username").asString();
String id = jwt.getClaim("id").asString();
logger.info("[当前用户]" + username);
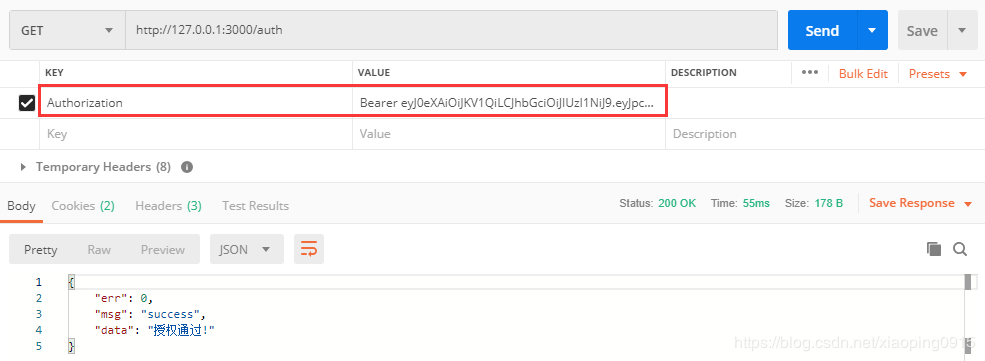
return Rs.ok("授权通过!");
}
1
2
3
4
5
6
7
8
9
10
11
12
13
14
15
16
17
18
19
20
21
22
23
2
3
4
5
6
7
8
9
10
11
12
13
14
15
16
17
18
19
20
21
22
23
顺便更新一下全局异常捕获类
/**
 * 异常捕获处理类
 */
@ControllerAdvice
public class WebExceptionHandler {

	private Logger logger = LoggerFactory.getLogger(WebExceptionHandler.class);

	@ExceptionHandler(value = Exception.class)
	@ResponseBody
	public Rs errorHandler(HttpServletRequest req, HttpServletResponse res, Exception e) {
		logger.error("", e);
		if (e instanceof InvokeException) {
			InvokeException ex = (InvokeException)e;
			return Rs.err(ex.getErr(), ex.getMessage());
		} else if (e instanceof TokenExpiredException) {
			res.setHeader(Constans.HEADER_AUTHORIZATION, null);
			return Rs.err(Rs.ERROR_CODE_AUTHORIZED_TIMEOUT, "会话已过期,请重新登录!");
		} else if (e instanceof JWTVerificationException) {
			return Rs.err(Rs.ERROR_CODE_UNAUTHORIZED, "验证授权出错!");
		}
		return Rs.errMsg("系统错误");
	}
}
1
2
3
4
5
6
7
8
9
10
11
12
13
14
15
16
17
18
19
20
21
22
23
24
2
3
4
5
6
7
8
9
10
11
12
13
14
15
16
17
18
19
20
21
22
23
24
验证用户 token 是一个公用的步骤,所以这一 部分的代码应该写到拦截器中,这里为了方便看代码直接写到业务方法中了。在代码厂库中的实现方式是写在拦截器中的,感兴趣的童靴可以看一下: