# Spring 胶水
上一篇介绍了 SpringBoot 的开箱使用,我们需要知道 SpringBoot 本质上是 Spring 的一个解决方案,在我看来, Spring 主要解决了对象之间协作关系(依赖)的管理和对业务间的共同步骤的抽取问题。
解决这些问题的同时也创造了一些小小的问题,我们编写 Spring 应用程序时往往需要大量的配置工作,当然这也很正常:一个精密的仪器往往也需要小心协调配置才能正确工作。
SpringBoot 为此而生,一系列的 starter 为我们解决了大量的配置工作。人类的进化史好像也是如此,进化的过程往往会带来许许多多的‘毛病’,然后我们在解决这些‘毛病’的过程中又会衍生出一些意想不到的‘毛病’,但是这些‘毛病’并不会阻止人类‘进化’的脚步。
不得不说,Spring 这个优雅的框架是个多么有启发的方法论阿。
# 使用之前
SpringBoot 不仅优雅而且强大(漂亮得不像实力派,是吧?) 使用之前还是看一下我们的小目标: 一句话说就是:让 SpringBoot 给我们整一个好使的 web 框架粗来。 怎么定义好使? 模板能力(FreeMarker\Thymeleaf\mustache...),我们在案例里面使用 FreeMarker; DB 能力,数据库连接使用 MySQL, 持久化层使用灵活的 MyBatis,数据库连接池使用阿里的 druid;还有部分第三方工具包就不在此赘述了。
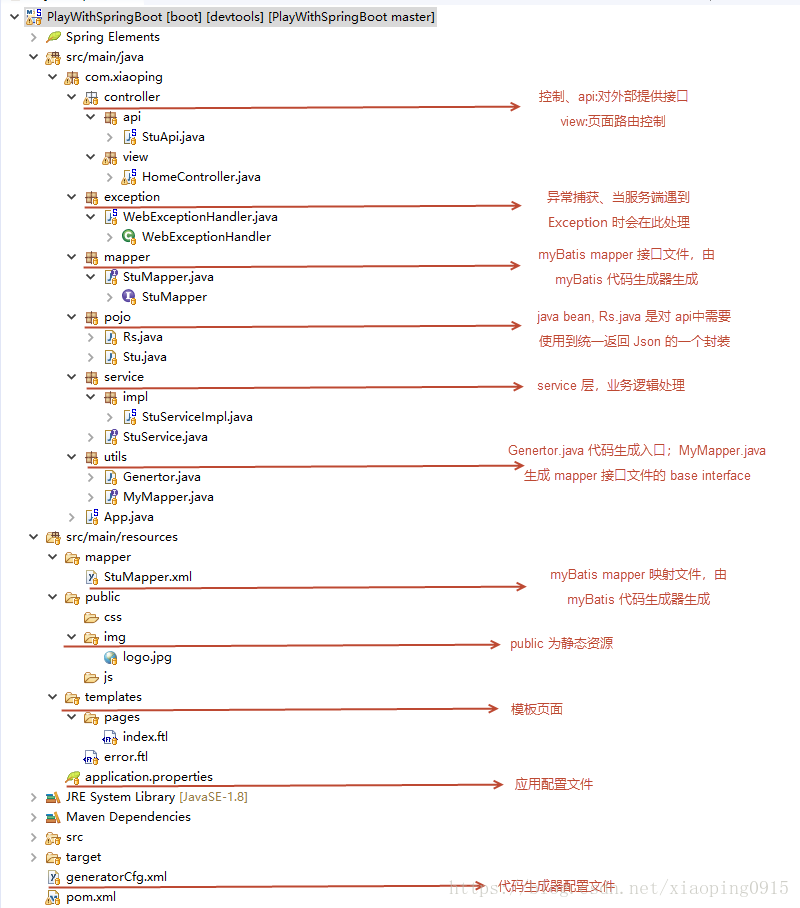
# 结构
# 部分代码
- pom.xml
		<!-- 模板引擎 FreeMarker -->
		<dependency>
			<groupId>org.springframework.boot</groupId>
			<artifactId>spring-boot-starter-freemarker</artifactId>
		</dependency>

		<!-- 数据库连接池 Druid -->
		<dependency>
			<groupId>com.alibaba</groupId>
			<artifactId>druid</artifactId>
			<version>1.1.0</version>
		</dependency>

		<!-- 数据库连接 mysql-connector-java -->
		<dependency>
		    <groupId>mysql</groupId>
		    <artifactId>mysql-connector-java</artifactId>
		    <version>5.1.6</version>
		</dependency>

		<!-- mybatis 对应 SpringBoot 的 starter -->
		<dependency>
			<groupId>org.mybatis.spring.boot</groupId>
			<artifactId>mybatis-spring-boot-starter</artifactId>
			<version>1.3.1</version>
		</dependency>

		<!-- druid 对应 SpringBoot 的 starter -->
		<dependency>
		    <groupId>com.alibaba</groupId>
		    <artifactId>druid-spring-boot-starter</artifactId>
		    <version>1.1.9</version>
		</dependency>

		<!-- basemapper -->
		<dependency>
			<groupId>tk.mybatis</groupId>
			<artifactId>mapper-spring-boot-starter</artifactId>
			<version>1.2.4</version>
		</dependency>

		<!-- 分页工具 pagehelper -->
		<dependency>
			<groupId>com.github.pagehelper</groupId>
			<artifactId>pagehelper-spring-boot-starter</artifactId>
			<version>1.2.3</version>
		</dependency>


		<!-- 代码生成 mybatis-generator -->
		<dependency>
		    <groupId>org.mybatis.generator</groupId>
		    <artifactId>mybatis-generator-core</artifactId>
		    <version>1.3.6</version>
		    <scope>compile</scope>
		    <optional>true</optional>
		</dependency>
1
2
3
4
5
6
7
8
9
10
11
12
13
14
15
16
17
18
19
20
21
22
23
24
25
26
27
28
29
30
31
32
33
34
35
36
37
38
39
40
41
42
43
44
45
46
47
48
49
50
51
52
53
54
55
56
57
2
3
4
5
6
7
8
9
10
11
12
13
14
15
16
17
18
19
20
21
22
23
24
25
26
27
28
29
30
31
32
33
34
35
36
37
38
39
40
41
42
43
44
45
46
47
48
49
50
51
52
53
54
55
56
57
- App.java
@SpringBootApplication
//扫描 mybatis mapper 包路径,注意需要修改成你自己的包路径
@MapperScan(basePackages = "com.xiaoping.mapper")
//扫描 所有需要的包, 包含一些自用的工具类包 所在的路径
@ComponentScan(basePackages= {"com.xiaoping"})
public class App {

    public static void main(String[] args) throws Exception {
    	// SpringApplication 将引导我们的应用,启动 Spring,相应地启动被自动配置的 Tomcat web 服务器。
    	// 我们需要将 Example.class 作为参数传递给 run 方法,以此告诉 SpringApplication
    	// 谁是主要的 Spring 组件,并传递 args 数组以暴露所有的命令行参数。
        SpringApplication.run(App.class, args);
    }
}
1
2
3
4
5
6
7
8
9
10
11
12
13
14
2
3
4
5
6
7
8
9
10
11
12
13
14
- application.properties
# listen port 配置服务器监听的端口号,缺省值为 8080
server.port=8080

# datasource  配置数据源
spring.datasource.url=jdbc:mysql://localhost:3306/test
spring.datasource.username=root
spring.datasource.password=root
spring.datasource.driver-class-name=com.mysql.jdbc.Driver

# match all for URL 配置路由匹配规则是否可以带后缀
# 开启后 /index 可以匹配任意后缀访问 -> /index.html /index.php /index.*  eq /index
spring.mvc.pathmatch.use-suffix-pattern=true

# static resources 配置静态资源访问路径
spring.mvc.static-path-pattern=/public/**
1
2
3
4
5
6
7
8
9
10
11
12
13
14
15
2
3
4
5
6
7
8
9
10
11
12
13
14
15
- WebExceptionHandler.java
// 由于我们这里捕获的是 Exception ,只要服务端发生异常,程序会统一在此处理
@ControllerAdvice
public class WebExceptionHandler {

	@ExceptionHandler(value = Exception.class)
	public Object errorHandler(HttpServletRequest req, HttpServletResponse res, Exception e) {
		e.printStackTrace();
		ModelAndView mav = new ModelAndView();
		mav.addObject("ex", e.getMessage());
		mav.setViewName("error");
		return mav;

	}
}
1
2
3
4
5
6
7
8
9
10
11
12
13
14
2
3
4
5
6
7
8
9
10
11
12
13
14
# Run
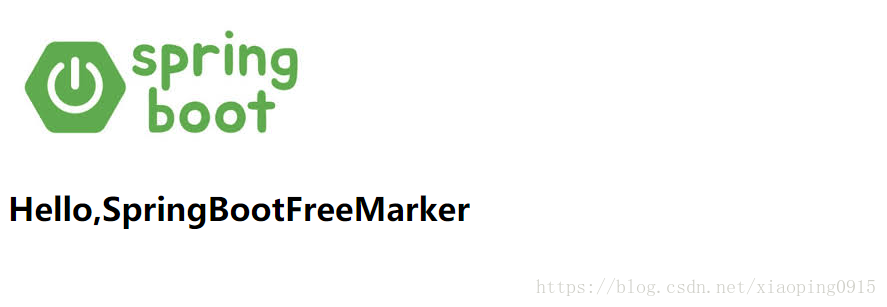
当你访问 127.0.0.1:8080 或 127.0.0.1:8080/index 亦或是 127.0.0.1:8080/index.html 时,应该会看到:
# 源码地址
https://github.com/xiaop1ng/PlayWithSpringBoot